07 silverado classic 5.3 what wires from ecm go to crank position sensor
Dan Ferrell writes about practice-it-yourself car maintenance and repair. He has certifications in automation and control technology.
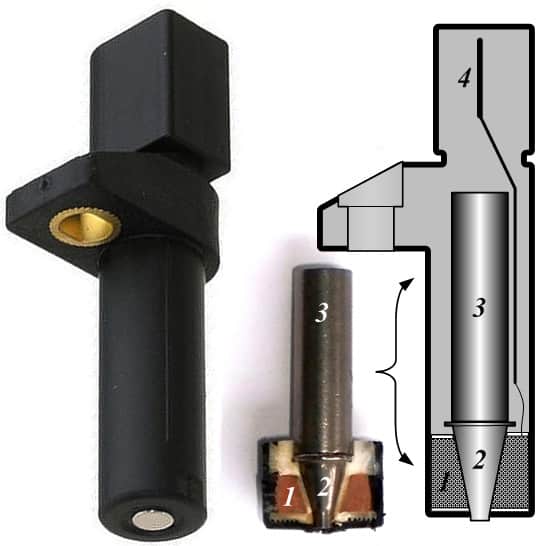
one. Gyre ii. Soft iron 3. Magnet 4. Electric connector.
Photograph courtesy of Tamasflex on Wikimedia.
Depending on your detail vehicle make and model, a failing or bad CKP tin produce one or more of the post-obit symptoms:
- Difficult to start
- Cranking, no-start condition
- Start and stall status
- Intermittent stalling
- Crude idle
- Hesitation
- Poor acceleration
- Increased fuel consumption
- Misfires
- Bank check Engine Low-cal On
- Tachometer may work erratically or not at all
However, issues in other systems (for instance the fuel or ignition systems) can besides produce some of the same symptoms. So, it is important to test the CKP to better diagnose the problem.
Although it'south recommended to exam a CKP sensor using an oscilloscope, this is non a common tool for many car owners or DIYers. Still, you lot tin can troubleshoot the sensor using a digital multimeter (DMM), whether your engine uses an inductive or Hall effect type sensor.
That's what you'll do here using this guide. Go along in mind, though, that you still need the CKP sensor electric values for your particular vehicle make and model; you lot'll need to locate the sensor, identify wires, and, if necessary, supervene upon it.
You tin can find this information in your vehicle repair manual. If you don't accept this manual yet, you can get a relatively cheap aftermarket copy through Amazon. Haynes manuals come up with images and stride-past-step procedures for maintenance, repair, and troubleshooting projects for many systems in your vehicle. So you'll recoup the small investment in no time.
| Index |
|---|
| one. What is a CKP Sensor Used For? |
| two. How To Tell If You Have an Inductive or Hall Effect CKP Sensor |
| 3. Troubleshooting a CKP Sensor |
| Checking the Wiring and Sensor |
| Testing an Anterior Type CKP Sensor |
| Testing a Hall Consequence Blazon CKP Sensor |
| 4. What if My CKP Passes the Examination? |
| five. Replacing the CKP Sensor |
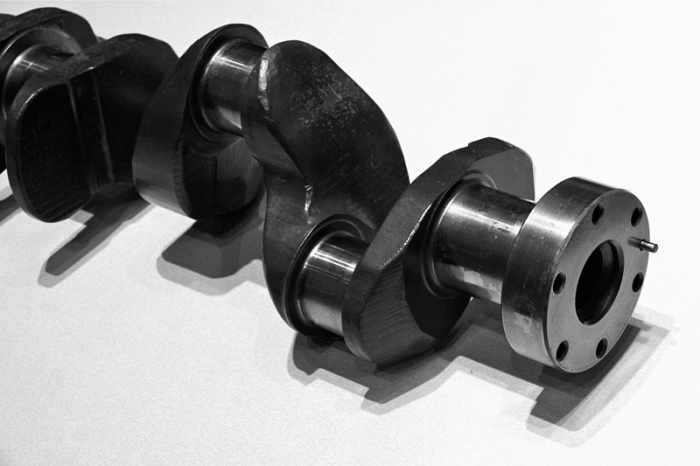
The CKP sensor monitors crankshaft position and engine speed.
Photo courtesy of Alex Kovach on Wikimedia.
one. What is a CKP Sensor Used For?
In general, the CKP monitors piston motion and crankshaft position. It also helps the computer monitor engine misfires and engine speed. The estimator uses this data to accommodate ignition timing and fuel injection.
However, a CKP sensor endures rut and vibration during engine operation. This eventually takes its toll and the sensor or its excursion may fail.
Equally with other emission related sensors, the car's calculator may store a diagnostic trouble code (DTC) pointing to a problem with the CKP sensor, or the sensor's circuit, like:
- P0315
- P0335-P0339
- P0385-P0389
If your engine uses a camshaft position (CMP) sensor, you can besides see a related code:
- P0016-P0019
Scroll to Continue
Read More than from AxleAddict
So it is important to troubleshoot the CKP when you suspect CKP problems to make certain the problem is with the sensor, the circuit, or ane of the components in the system information technology works with.
The adjacent sections volition help y'all test your CKP sensor using just a digital multimeter (DMM), whether your engine uses an anterior or Hall effect blazon sensor.
2. How To Tell If Y'all Have an Inductive or Hall Outcome CKP Sensor
Basically, most vehicles on the route today use one of two types of CKP sensors.
Inductive (magnetic) CKP sensor:
- May have one or ii wires
- Mounts in forepart of a rotor or reluctor bicycle
- Produces its own Air conditioning voltage bespeak
Hall-effect CKP sensor:
- May have 3 or four wires
- Mounts in front of a rotor or reluctor wheel
- Generates a digital (square wave) bespeak
- Requires an outside power source and a ground to produce the signal
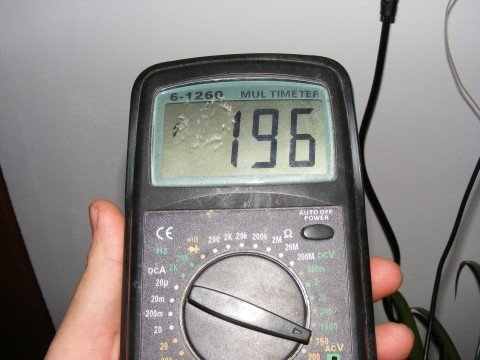
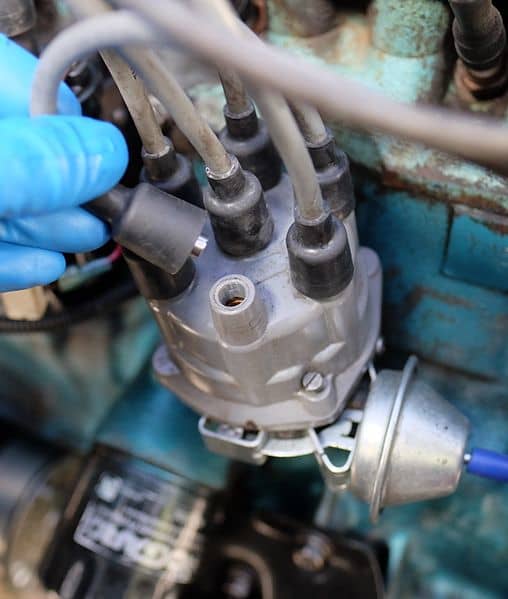
You tin use a digital multimeter to test the CKP sensor.
Photo courtesy of Emilian Robert Vicol on Wikimedia.
iii. Troubleshooting a CKP Sensor
Many problems with the CKP sensor tin be located on the wiring harness or the sensor'due south connector. Then make sure to advisedly cheque them earlier starting to troubleshoot the sensor itself. Only first, locate the sensor.
Depending on your particular vehicle brand and model, you can find the CKP sensor:
- mounted on an engine front cover or timing encompass, most the crankshaft caster or backside the harmonic balancer.
- somewhere around the middle of the engine cake.
- nether the starter motor.
- on the rear of the engine, at the bellhousing of the transaxle near the flywheel ring gear.
If necessary, consult your vehicle repair manual to locate the sensor on your specific model.
Checking the Wiring and Sensor
Many times, a failing or inoperative sensor comes from a bad wire or connector. Make a visual inspection of the harness and connectors between the sensor and the PCM or ignition module.
- Check the wires for damage
- Check for loose wires
- Check for loose sensor mounting bolts
- Cheque the electric connector for impairment
- Cheque the sensor itself for signs of impairment
- If necessary, bank check the air gap between the sensor tip and the rotor. Consult your vehicle repair manual for the specification.
- Remove the sensor and cheque it for metallic shavings or filings stuck to the sensor's magnetic tip.
- Audit the sensor reluctor wheel for damage.
If your vehicle uses a benefactor, disable the ignition system to creepo the engine.
Photo courtesy of Frédéric MICHEL on Wikimedia.
Testing an Inductive Type CKP Sensor
The following steps give you an example on how to test an anterior type CKP sensor.
Keep in heed that some manufacturers provide a protective shield along the sensor's wiring, under the insulation. This prevents electrical interference. And there could be a 3rd wire on the harness connector.
All the same, make sure to consult your vehicle repair manual for the electrical value specifications and, possibly, a recommended way to exam the CKP sensor in your detail model, if necessary.
- Unplug the CKP sensor electrical connector.
- Set your digital multimeter to DC voltage scale using a low range.
- Turn the ignition primal to the On position, but don't start the engine.
- Affect the DMM blackness lead to ground. This tin can be a clean surface on the engine, a metallic bracket or the battery negative (-) post.
- Touch on the DMM red lead to each of the sensor wires on the harness connector you lot just unplugged. I of the wires should produce effectually 1.5 volts; otherwise, the sensor is not receiving a reference voltage, and needs to be fixed.
-
To preclude the engine from starting:
- Disable the fuel system by removing the fuel pump fuse or relay.
- Or disconnect the ignition cablevision between the ignition curl and distributor.
If necessary, consult your vehicle repair manual. This will foreclose the engine from starting.
- Fix your digital voltmeter to a low range on the AC voltage scale.
- Connect your meter leads to the sensor pins. Brand sure to keep your meter lead wires away from engine moving parts during this test.
- Have an banana crank the engine for a few seconds while you watch the meter's readout.
- The sensor should produce a voltage pulsing betoken. If yous don't see any voltage pulses, replace the sensor. If your multimeter tin can measure frequency (Hz), you can use this setting in the aforementioned mode you check for an AC signal. Compare your results to the manufacturer specifications. Consult your vehicle repair transmission.
You tin can check your inductive CKP sensor's resistance:
- Gear up your DMM to the Ohms calibration.
- Unplug your CKP electrical connector.
- Connect one DMM lead to one of the sensor pins and the other DMM pb to the other sensor pivot. It doesn't matter which.
-
Plough on your DMM.
- The readout should betoken a resistance value, usually between 200 and 2000 ohms, depending on your particular vehicle model.
- Compare your results to the manufacturer specifications. You lot may observe the specification in your vehicle repair manual. If out of specification, supplant the sensor.
- If the readout is infinite resistance, the sensor has an open in the circuit;
- If the readout is zero ohms, the sensor has a short excursion.
When disconnecting the ignition cable from the distributort, ground it to the engine with a jumper wire.
Photo courtesy of Dennis Bratland on Wikimedia.
Testing a Hall Consequence Blazon CKP Sensor
Testing a Hall effect type sensor is best using an oscilloscope. But not many DIYers ain one. Even so, yous can use a DMM to test this type of CKP sensor in your vehicle. And, unless stated in your vehicle repair manual, do not check the resistance of your Hall result CKP sensor. The induced voltage may harm internal components.
Although you won't run across the loftier and low voltage graphic and frequency you see on an oscilloscope readout, you'll get the average voltage coming from the sensor, which volition requite you an idea of its operation.
-
Remove the fuel pump fuse or relay to prevent the engine from starting during this test.
- If your engine uses a distributor, you can unplug the center ignition cable and ground information technology to the engine using a jumper wire.
- If necessary, consult your vehicle repair manual.
- Unplug the CKP sensor electric connector.
- Set up your DMM to DC volts and to a range of 20 Volts.
- Touch the DMM blackness lead to the blackness wire on the harness connector.
-
Bear upon the DMM ruby-red lead to the cherry (power) wire on the harness connector.
- You may need to cheque the wiring diagram for your particular model, if the CKP sensor uses wires of different colour to place the ground, ability and bespeak wires.
- Turn the ignition central to the On position.
- Your meter should read between 5 and 13 volts. Consult your vehicle repair manual for the reference voltage value for your particular model. If your reference voltage is lower than expected or nada, check the wire and connector for harm, or a loose concluding. If necessary, check your car'due south figurer.
- Turn the ignition Off and plug back in the CKP sensor to the harness connector.
- Set your DMM to a low DC voltage setting and then that you can read millivolts.
- Touch the DMM black lead to battery negative.
- Then, using the meter red lead, back probe the black, ground wire at the harness connector or CKP sensor.
- Ask an assistant to crank the engine for a few seconds. Your DMM should register well-nigh 200mv to 300mv.
- At present, touch your DMM cerise pb to the greenish (indicate) wire on the harness connector or CKP sensor.
- Crank the engine for a few seconds. You meter should register around 300mv. This is an average voltage value of the signal the CKP sensor produces.
If necessary, compare your results to the specs in your vehicle repair manual.
If your multimeter tin can read Duty Cycle signals, you lot may be able to detect a CKP betoken also, depending on your particular organisation. Yous can practise this by backprobing the signal wire on the sensor and connecting the DMM black lead to basis.
- Fix your DMM to Duty Cycle and ask an assistant to creepo the engine.
- If the CKP doesn't produce a duty cycle signal, the sensor may be bad.
Although non as common, your automobile's computer can too be at error here.
Photo courtesy of Ahsanriaz6157 on Wikimedia.
4. What if My CKP Passes the Test?
Even if your engine experiences the symptoms of a bad CKP, it doesn't necessarily mean that your sensor, wiring or a connector is bad. The trouble could lie with those components information technology communicates with.
Perhaps at that place could exist a problem with the ignition command module (ICM) or even, although non as common, the PCM itself, depending on the particular configuration for your model. If necessary, consult your vehicle repair manual.
Also, if the ignition system is producing a spark but the fuel injectors are not working, y'all may want to cheque the camshaft position sensor.
5. Replacing the CKP Sensor
In general, replacing a CKP sensor is a pretty straightforward operation. All the same, on some models you may need to remove one or more components to access the sensor. Consult your vehicle repair manual.
- Brand sure the engine is cool and the ignition switch is in the Off position.
- Disconnect the negative (blackness) terminal from the bombardment.
- On some models, you lot may need to enhance the front of the vehicle, and secure it safely on jack stands, to gain access to the sensor.
- Unplug the CKP sensor electrical connector.
- Unscrew the mounting bolt(due south).
- Remove the sensor from the engine.
- Lucifer the former sensor to the new one.
- If your sensor comes with an O-band, apply a light coat of oil to the ring before installing the sensor. This helps to seat the sensor correctly, helps the sensor produce the correct bespeak, and prevents oil leaks.
- Install the new sensor in identify and tighten the mounting bolts.
- Plug the sensor electrical connector.
- Connect the negative terminal to the battery.
On some engines, you need to prepare the correct gap for the sensor. Follow the instructions that come with your new CKP sensor or your vehicle repair manual. The next video gives you an idea on how to replace a crankshaft position sensor.
This article is accurate and true to the best of the writer's knowledge. Content is for informational or entertainment purposes only and does not substitute for personal counsel or professional advice in concern, financial, legal, or technical matters.
Questions & Answers
Question: What if the sensor tests good and gets power but the coil will non fire?
Answer: In that location could exist a problem with the ignition ringlet or the ignition module, depending on your system'southward particular configuration. Y'all may need to consult your vehicle repair manual and diagram for this.
Question: My CKP sensor is intermittent, but yesterday I managed to get the following info: the output signal went up to 11.2V whereas it was 0.4V. Later the engine warmed up it went back to 0.4V. Why does it do this? Is it a faulty sensor?
Answer: A common CKP sensor fault comes from the internal coil or wiring. A wire can break but nonetheless make contact. Temperature gives it away because it makes the gyre expand (oestrus) and contract (cool). It can be very annoying sometimes because whenever you examination it, it gives proficient parameters. Ordinarily, the all-time way to examination this blazon of error is to warm up the sensor in hot water and compare your reading to the sensor when it's cool. Promise this helps.
Question: Why would my car but start on the second creepo?
Respond: Make sure you got proficient connections between the battery and the starter. Check this other postal service. Information technology may help:
https://axleaddict.com/auto-repair/How-to-Employ-Volt...
© 2019 Dan Ferrell
Source: https://axleaddict.com/auto-repair/How-to-Test-a-Crankshaft-Position-Sensor-Using-a-Multimeter
0 Response to "07 silverado classic 5.3 what wires from ecm go to crank position sensor"
Post a Comment